Monday, 12 January 2015

How To Make An Undeletable Folder in Windows

How To Make An Undeletable Folder


It probably happened once, that someone deleted a folder ,which is containing a few hundred files and was very important.If you’d like to avoid anything similar happening in future.You can protect your important folders by making them Undeletable . Here is simple tip, which can help you. 


1) Open cmd Type in Run option cmd or navigate to All Programs->Accessories-> Command Prompt) 

2) In cmd change to the directory that you want,I change to E.Just type E: and enter.


change directory


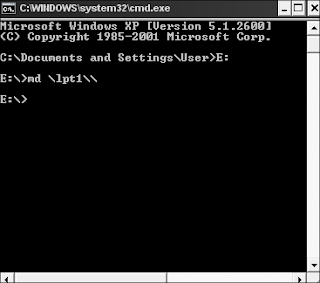
3) Type md \lpt1\\ and press enter, the folder will now in your E:


command  md \lpt1\\

4) If you try to delete or rename it, it will appear error message

delete attempt

How to delete undeletable folder?

Just go to cmd Navigate to the directory and type in rd \lpt1\\


commant rd \lpt1\\

[ROOT] Framaroot, a one-click apk to root some devices

Installation
  1. Download it on your device (links are available at the end of this post)
  2. Install it with a file explorer or directly from your internet browser, if android warn you about security risk, say OK and check Unknown sources to allow install of applications outside of Play Store.

Steps of the Android Rooting method: Framaroot. Root using Framaroot

1.- Download Framaroot APK.
2.- If you downloaded the APK file on your pc connect the device to your PC and copy it into the SD card. if you have downloaded directly on the device to go to step 3
3.-Make sure that you have enabled the download of other platforms different from Google Play. You can check this in the following path: Menu > Settings > Unknown sources (ON)
4.- After this is done, use any File Manager (Astro File Manager, ES File Explorer,…) to install the file. You can install any file manager from Google Play.
5.- Enable USB Debugging in your device from the path “Settings > Applications > Development > USB debugging”. The option of USB Debugging should be ticked.
6.- From your device, click on the Framaroot APK file and then follow all the on-screen instructions you see.
7.- Once the app is installed on your phone, launch GingerBreak app and when it will be opened click on the “Root” button in application.
8.- Wait a few minutes for the process to finish and reboot your device.
9.- If you want to check if you are already root or superuser in your Android phone or tablet you can download HowToRoot app from Google Play Store and click over the padlock in the top-right of the screen. It will show you a message about if your device is rooted or not.


 Framaroot

Android Data Recovery Pro Full Free Download


             Android Data Recovery Pro


Android Data Recovery Pro screenshot

Android Data Recovery Pro will help you recover deleted data as well as other data from your Android phone.
Android Data Recovery Pro is easy-to-use Android recovery software. The software can effectively recover deleted or lost photos, music, video, and multimedia files from almost all Android phones after disasters like erroneous deletion, corruption or formatting errors, etc.
When you encounter data loss of your Android phones or tablets, just use Android Data Recovery Pro.


Download

How to Configure WiFi Hotspot in Windows 7 Using Command Prompt

How to Configure WiFi Hotspot in Windows PC


Step 1:

  • Select Command Prompt(Admin) in your computer.
  • Command: Windows key( ) + X

Step 2:

  • Check whether your computer is supported for Hosted network or not. Type the following command in Command Prompt.
  • Command : netsh wlan show drivers

If the result is “YES” then proceed to Step 3 or else download the required drivers from your vendor website.

Configuring the Hosted network connection:

Step 1:

  • Type “netsh wlan set hostednetwork mode=allow ssid=yourname key=yourpassword” (enter the command without the quotations).
  • Note: In this example, I have used my own user Name and Password. You can use your own parameters for SSID and KEY and Password must be greater than 8 digits.

You have successfully established the Network Connection.

Step 2:

  • Start your hosted network.
  • Command : netsh wlan start hostednetwork
If your Command Prompt says ” your hosted network couldn’t be started ” then make sure to turn on the “WiFi” and also enable the Wireless Adapter :)

When there is no error:

Sharing your Wireless Network Adapter

Step 1:

  • Go to control Panel -> Network and Internet and select Network and Sharing Center.

Step 2:

  • There you can see your newly created network under the original network connection.

Step 3:

  • Select “Change adapter settings” in the left side column of Network and Sharing Center.

Step 4:

  • Right click on your Wireless Network Adapter and select properties. Select the tab “Sharing“. Check the option “Allow other network users to connect through this internet’s connection” option. Mention your newly created hosted network name.

Step 5:

  • Check whether your hosted network has shared the network access or not from the Network Sharing and Center.

  • Wahoooo!! You have successfully turned on your WiFi Hotspot. Now you can surf internet from any device using the Hotspot.
  • Here i’m going to connect my Mobile using the configured WiFi Hotspot.

  • To stop the hosted network, type the command ” netsh wlan stop hostednetwork” in command prompt.
Do you think typing a command for starting/Stopping the WiFi Hotspot is a time dependent?
OK, i’m going to show you one trick so that you can Start/Stop your WiFi Hotspot in a single click.

Secret Codes For Nokia Mobiles


https://blogger.googleusercontent.com/img/b/R29vZ2xl/AVvXsEj0Wba3k3aJ8SBb6PEbmKwWoWzhcwhzHKxmv7N967WIUvGRe9BXnxdu6FPCWxGwTbzq-21pNE1JcRGxqIYLVAOxt7ueUdm3RaesfpxqeS2u3_FrKspp2YMEH0C-FU8aohdQEJzBT1oLGuQ/s1600/Nokia-Phones-Universal-Secret-Codes-free.jpg 

Nokia Secret Codes:

*#7780# :reset to factory settings.
*#67705646# :This will clear the LCD display (operator logo).
*#0000# :To view software version.
*#2820#: Blue tooth device address.
*#746025625# :Sim clock allowed status.
*#62209526# : Display the MAC address of the WLAN adapter. This is available only in the newer devices that support WLAN
#pw+1234567890+1#: Shows if sim have restrictions.
*#92702689# : takes you to a secret menu where you may find some of the information below:
1. Displays Serial Number.
2. Displays the Month and Year of Manufacture
3. Displays (if there) the date where the phone was purchased (MMYY)
4. Displays the date of the last repair – if found (0000)
5. Shows life timer of phone (time passes since last start)
*#7328748263373738# resets security code.  Default security code is 12345
Warranty Codes  * # 92702689 # [* # war0anty #]

Secret Codes For All Android Phones


secret android codes

 Android Secret Codes:

For IMEI Number: *#06#  
For RAM Memory version: *#*#3264#*#*
For FTA SW version: *#*#1111#*#*
For FTA HW version: *#*#2222#*#*
For Touchscreen version: *#*#2663#*#*
View Phone Lock Status: *#7465625#
Executes Emergency Dial Screen to unlock PUK Code: **05**#
Enables Voice Dialing Logging Mode: *#*#8351#*#*
Disables Voice Dialing Logging Mode: *#*#8350#*#*
Change behavior of Power button: *#*#7594#*#*
To test Vibration and Back-light of device: *#*#0842#*#*
To test Proximity/Distance Sensor: *#*#0588#*#*
To test Touchscreen: *#*#2663#*#*
For Audio Test: *#*#0289#*#* or *#*#0673#*#*
To launch Service Mode: *#*#197328640#*#*
Hidden Service Menu (Motorola Droid): ##7764726
Field Test: *#*#7262626#*#*
To format the phone: *2767*3855#
To start GTalk Monitoring: *#*#8255#*#*
To get PDA, Phone, H/W and RF Call Date: *#*#4986*2650468#*#*
Displays Build Time and Change List number: *#*#44336#*#*
Packet Loopback Test: *#*#0283#*#*
LCD  Display Test: *#*#0*#*#*
Enter Service Menu (on New Phones): *#0*#
Diagnostic Configuration: *#9090#
USB Logging Control: *#872564#
System Dump Mode: *#9900#
To test Bluetooth: *#*#232331#*#*
To display Bluetooth Physic Address: #*#232337#*#
To test secret GPS: *#*#1472365#*#*
To test other GPS:  *#*#1575#*#*
To test WiFi/Wireless LAN of phone: *#*#232339#*#* or *#*#528#*#* or *#*#526#*#*
To display Wi-Fi MAC Address: *#*#232338#*#*
To Restore Factory Settings: *#*#7780#*#*
To create Immediate backup of your multimedia files: *#*#273282*255*663282*#*#*
To display Phone Information: *#*#4636#*#*
To get detailed Camera Information: *#*#34971539#*#*
For Software & Hardware Information: *#12580*369#
To display HSDPA/HSUPA Control Menu: *#301279#

QUICK HEAL TOTAL SECURITY 2014 WITH CRACK


TESTED BY ME MANY TIMES


QUOTE: USE YOUR QUICK HEAL FOR 

LIFETIME 100% FULL! no purchasing required~!!

Today  am going to give you Quick heal total security 2014 full version crack (hack) which you can use forever.

1.       Download the quick heal total security 2014 setup (New) from bellow.

                            Quick heal total security 2014 - 32 bit
                            Quick heal total security 2014 - 64 bit 

For Quick Heal 64 bit use this trial resetter >> Quick Heal 64 bit trial resetter

2.     Now install Quick heal total security 2014 setup.

3.     Now connect your system to internet to activate the antivirus. You can also update it whenever you want. No need to give any keys.

4.     Now this quick heal work for 30 days. As it is a 30 days trial version. So no need to worry for that . I have a solution for that also.

After 30 days, just repeat the steps 2,4 & 5 as given above. Again you will get 30 days... WOW...!!!!

Similarly Every Month, just repeat steps 2,4 & 5  

In this way you will able to use the 30 days trial version again and again.You can connect your internet. It will update again and again with no any problem. At all.....


TRICK TO DOWNLOAD QUICK HEAL UPDATES 2014 FROM IDM AND THEN APPLY THEM !!

I know that you are tired of downloading updates and then updating quick heal every after 30 days since the updates are very large , it is very difficult to download them every month. you can save those updates and apply them manually.for this follow the below steps.

STEP 1 ~ First download the update file (zip) from the below links.
download updates (zipped) here >>>

Download updates 2014

STEP 2 ~ Now right click over that updates zipped file and decompress to any folder. (make any new folder in any drive)

Step 3 ~ Now Open quick heal , Go to settings >> automatic updates >> tick on pick updates from specified path & give the folder path where you uncompressed in (step 2)

Step 4 ~ Now save changes. go back to dashboard and then click on update now ! It will update till today.

STEP 5 ~ Now again go to settings >> automatic updates >> now tick mark on "download from internet" and then tick mark on "copy update files to specified location". and below browse and give that path of the folder which you made on (step 2).

STEP 6 ~ now save changes and enjoy !!